> ## Documentation Index
> Fetch the complete documentation index at: https://docs.gitar.ai/llms.txt
> Use this file to discover all available pages before exploring further.
# Jira
> Connect your Jira workspace to keep issues and pull requests in sync
export const ThemeImage = ({src, alt}) => {
let lightSrc, darkSrc;
if (src.includes("-light.")) {
lightSrc = src;
darkSrc = src.replace("-light.", "-dark.");
} else if (src.includes("-dark.")) {
darkSrc = src;
lightSrc = src.replace("-dark.", "-light.");
} else {
lightSrc = src;
darkSrc = src;
}
return

 ;
};
## Overview
The Gitar Jira Integration seamlessly connects Jira issues with your pull requests. Gitar can read issues, update status, and add comments — keeping project management and code reviews in sync.
Detect and link Jira issues even when ticket references are missing
Add implementation summaries to linked issues when PRs merge
Suggest reviewers based on Jira watchers and stakeholders
Create follow-up issues for unresolved comments and new TODOs
## Authentication Methods
Gitar supports two ways to authenticate with Jira:
### OAuth 2.0 (Recommended)
OAuth provides secure, one-click authentication with automatic token refresh. No manual token management required.
### Personal Access Token (PAT)
Personal Access Tokens provide direct API access with manual token management.
## Get Started with OAuth
Follow these steps to connect your Jira workspace using OAuth 2.0 (recommended).
Before connecting with OAuth, ensure your organization has configured the Gitar OAuth app in the [Atlassian Developer Console](https://developer.atlassian.com/console/myapps/). Contact your administrator if you need access or assistance with OAuth app configuration.
Navigate to your organization's settings in the Gitar dashboard to begin the integration:
1. Navigate to your organization's **Settings** in the Gitar dashboard
2. Go to the **Integrations** section
3. Find the **Jira** card under **Ticketing & Documentation** and click **Connect**
In the Jira connection dialog, you'll see two authentication options:
1. Select the **OAuth** tab
2. Click **Connect with OAuth**
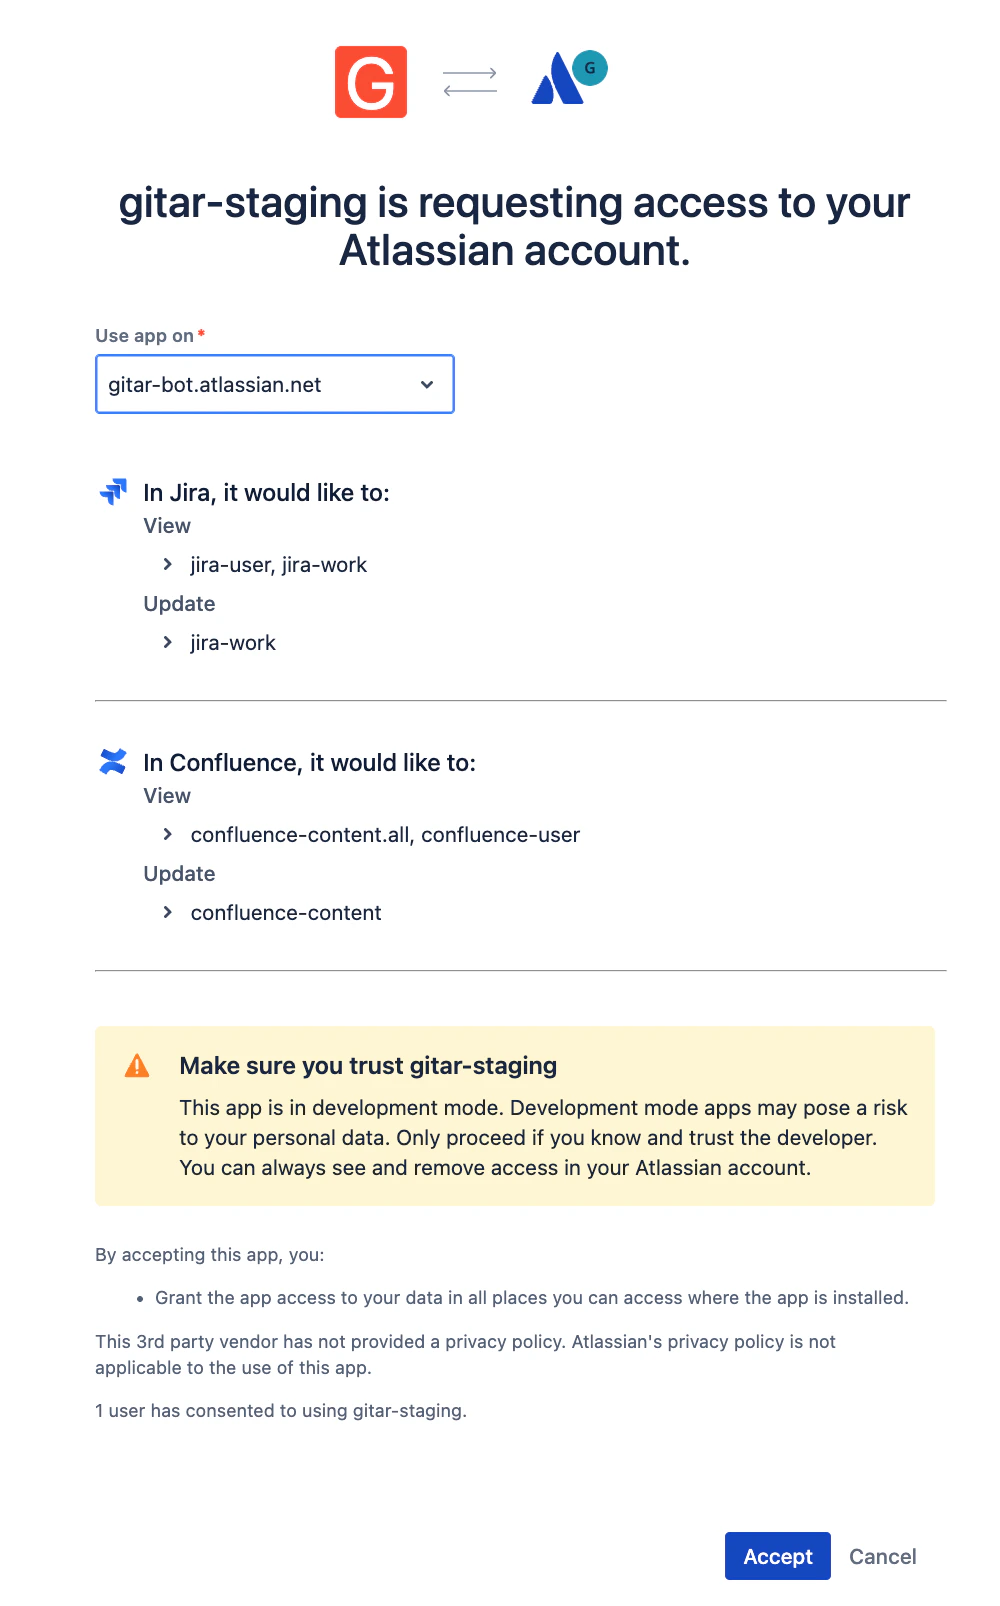
You'll be redirected to Atlassian's authorization page:
1. Select your Atlassian site
2. Review the permissions requested
3. Click **Accept** to authorize Gitar
;
};
## Overview
The Gitar Jira Integration seamlessly connects Jira issues with your pull requests. Gitar can read issues, update status, and add comments — keeping project management and code reviews in sync.
Detect and link Jira issues even when ticket references are missing
Add implementation summaries to linked issues when PRs merge
Suggest reviewers based on Jira watchers and stakeholders
Create follow-up issues for unresolved comments and new TODOs
## Authentication Methods
Gitar supports two ways to authenticate with Jira:
### OAuth 2.0 (Recommended)
OAuth provides secure, one-click authentication with automatic token refresh. No manual token management required.
### Personal Access Token (PAT)
Personal Access Tokens provide direct API access with manual token management.
## Get Started with OAuth
Follow these steps to connect your Jira workspace using OAuth 2.0 (recommended).
Before connecting with OAuth, ensure your organization has configured the Gitar OAuth app in the [Atlassian Developer Console](https://developer.atlassian.com/console/myapps/). Contact your administrator if you need access or assistance with OAuth app configuration.
Navigate to your organization's settings in the Gitar dashboard to begin the integration:
1. Navigate to your organization's **Settings** in the Gitar dashboard
2. Go to the **Integrations** section
3. Find the **Jira** card under **Ticketing & Documentation** and click **Connect**
In the Jira connection dialog, you'll see two authentication options:
1. Select the **OAuth** tab
2. Click **Connect with OAuth**
You'll be redirected to Atlassian's authorization page:
1. Select your Atlassian site
2. Review the permissions requested
3. Click **Accept** to authorize Gitar
 Once authorized, you'll see a confirmation that your Jira integration is connected.
## Get Started with Personal Access Token
Follow these steps to connect using a Personal Access Token.
Create a Personal Access Token in your Atlassian account:
1. Go to [Atlassian API tokens page](https://id.atlassian.com/manage-profile/security/api-tokens)
2. Click **Create API token**
3. Give it a descriptive name (e.g., "Gitar Integration")
4. Copy the generated token (you won't be able to see it again)
Return to the Gitar Jira integration dialog:
1. Select the **Personal Access Token** tab
2. Enter your **Jira Instance URL** (e.g., `https://your-company.atlassian.net`)
3. Enter your **Jira User Email**
4. Paste your **Personal Access Token**
After entering all the required information:
1. Review your credentials
2. Click **Save** to complete the connection
Your Jira PAT integration is now active and ready to use.
## Frequently Asked Questions
### What permissions does Gitar need?
For OAuth, Gitar requests:
* Read Jira issues and user information
* Write to Jira (create/update issues, add comments)
* Offline access (for automatic token refresh)
### How often are OAuth tokens refreshed?
OAuth tokens are automatically refreshed before they expire to maintain continuous connectivity. No manual intervention required.
### What happens if my PAT expires?
You'll need to generate a new token and update it in Gitar by going to **Settings** → **Integrations** → **Jira** → **Configure**.
## Enable Jira Features
Once your Jira integration is connected, you can enable specific features through your repository's Rules page:
1. Navigate to your repository in the Gitar dashboard
2. Go to **Rules** in the sidebar
3. Find the Jira-related rules and toggle them on
Once authorized, you'll see a confirmation that your Jira integration is connected.
## Get Started with Personal Access Token
Follow these steps to connect using a Personal Access Token.
Create a Personal Access Token in your Atlassian account:
1. Go to [Atlassian API tokens page](https://id.atlassian.com/manage-profile/security/api-tokens)
2. Click **Create API token**
3. Give it a descriptive name (e.g., "Gitar Integration")
4. Copy the generated token (you won't be able to see it again)
Return to the Gitar Jira integration dialog:
1. Select the **Personal Access Token** tab
2. Enter your **Jira Instance URL** (e.g., `https://your-company.atlassian.net`)
3. Enter your **Jira User Email**
4. Paste your **Personal Access Token**
After entering all the required information:
1. Review your credentials
2. Click **Save** to complete the connection
Your Jira PAT integration is now active and ready to use.
## Frequently Asked Questions
### What permissions does Gitar need?
For OAuth, Gitar requests:
* Read Jira issues and user information
* Write to Jira (create/update issues, add comments)
* Offline access (for automatic token refresh)
### How often are OAuth tokens refreshed?
OAuth tokens are automatically refreshed before they expire to maintain continuous connectivity. No manual intervention required.
### What happens if my PAT expires?
You'll need to generate a new token and update it in Gitar by going to **Settings** → **Integrations** → **Jira** → **Configure**.
## Enable Jira Features
Once your Jira integration is connected, you can enable specific features through your repository's Rules page:
1. Navigate to your repository in the Gitar dashboard
2. Go to **Rules** in the sidebar
3. Find the Jira-related rules and toggle them on